Showing posts with label Star Wars. Show all posts

Saturday, September 17, 2016

R2D2 Cake

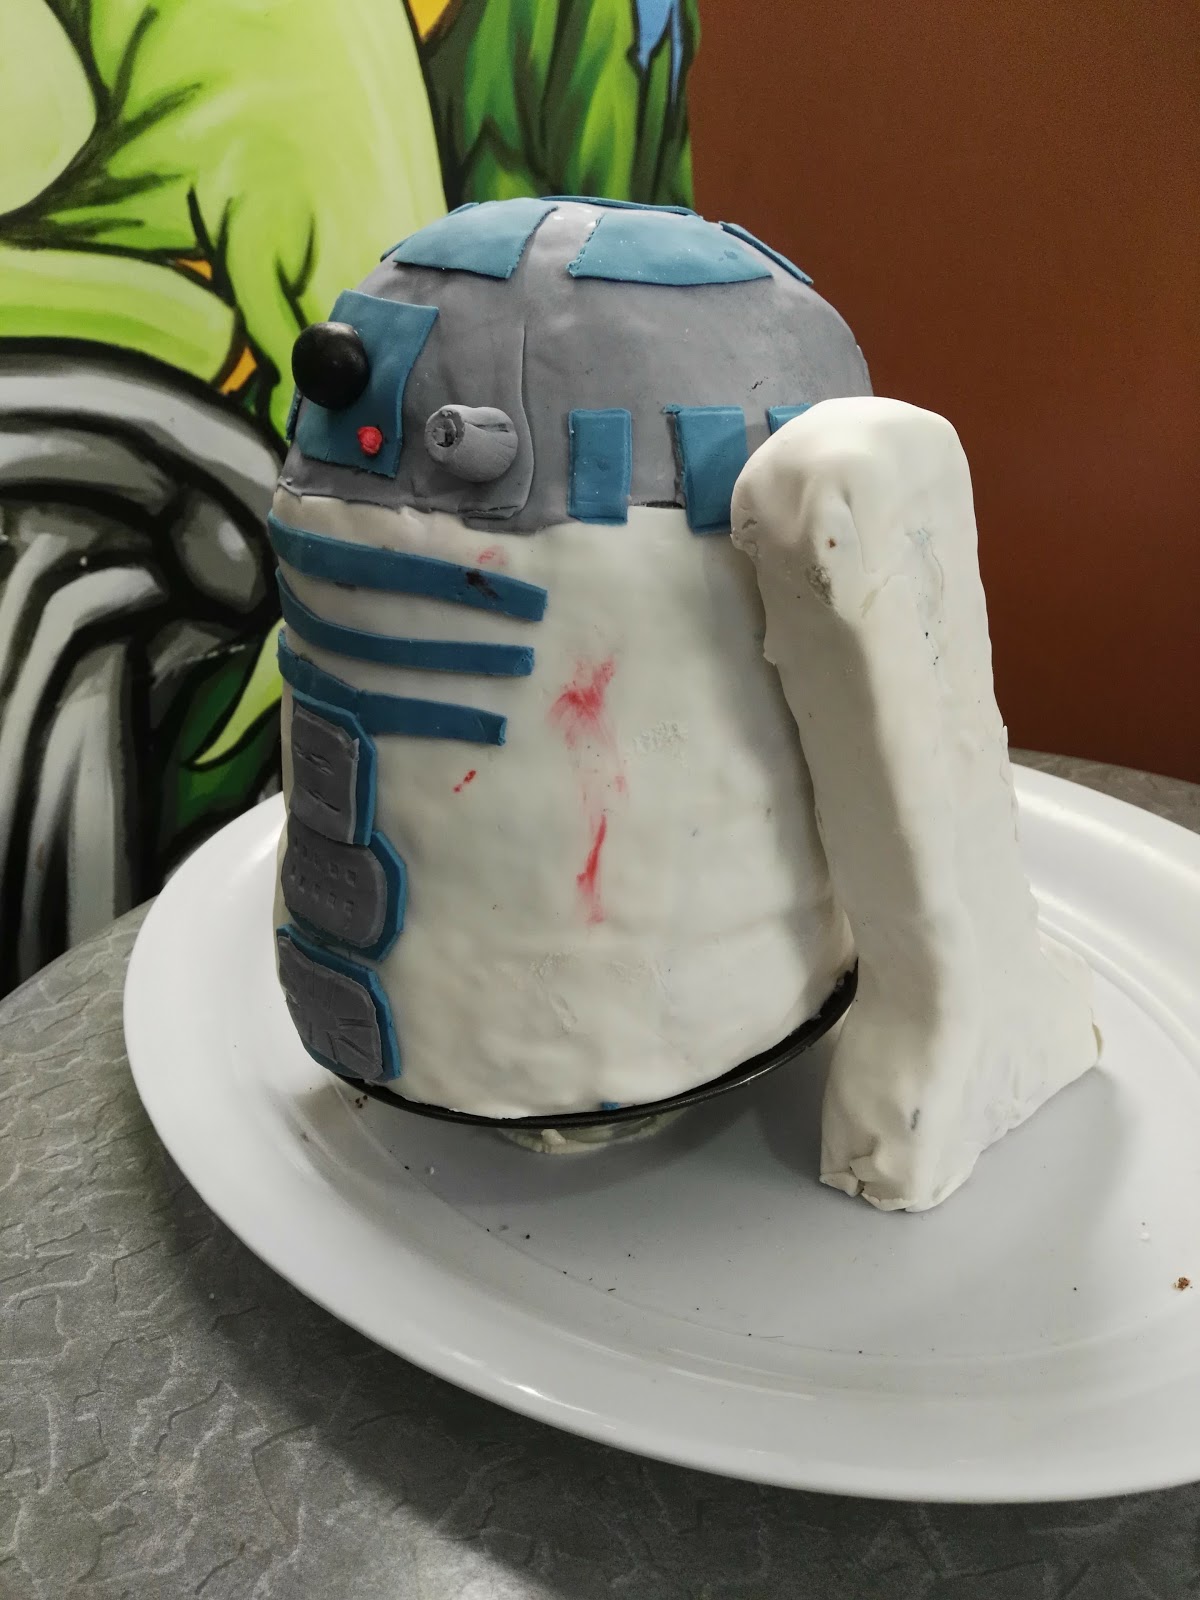
Widget and Sprog were invited to the Star Wars party of a friend. Last year I made this friend his cake, a minion cake. This year I was making the cake again. He chose a Star Wars theme, and after tossing a few ideas around, he settled on R2D2. I have been wanting to try R2D2 or a Death Star for a while, so I was very happy with his choice. For those a bit fuzzy on their Star Wars characters, this is R2D2:


The first step was figuring out the scale. I used a mostly round metal bowl for the rounded top, which had a diameter of 6" at the mouth, so 6" was the logical size for the rest of the cake. I used packet mix cakes, 4 of them, to make my life easier, when I was both working full time and making an Ewok costume in the same week. I baked the cakes over two nights and cut the tops of the three rounds, and trimmed the "head" to be a bit rounder.
The four pieces were crumb coated using white chocolate ganache, then stacked together and secured with three skewers before going in the fridge overnight.  I stacked them on a slight angle, the way R2D2 is when rolling along. I used the natural skew-wiffness of my leveling to create this angle.  The next night I smoothed out the ganache and wrapped on white fondant for the "body". 


 I coloured some more fondant grey and cut out a circle using a pot lid that I smoothed on the top. Then the fun began. I coloured some blue, cut out a circle, then another circle from inside that. The smaller circle went on top of his head, the outer circle I cut into about 8 pieces and spread 6 of them around the centre circle. Using leftover grey fondant I made  the sticky out bits that go on his head, and used a short piece of skewer to secure it in the appropriate places. The eye was a rolled ball of chocolate fondant cut in half with another piece of skewer to secure it. I cut out a bunch of blue and grey pieces and matched them to the model R2D2 from the toy box. The red light is just a teeny piece of red fondant. 

For legs I made a slice in double quantities and left it in the fridge overnight to go solid. Using masking tape I made a pattern of the height and angle of the legs and feet. I put this pattern on the slice and cut them out. 


I crumb coated these, with butter icing this time, and left them in the fridge overnight, before covering them with white fondant in the morning. 

The last step was assembly which I did at the venue. I took along some white buttercream to use as glue (pure buttercream goes whiter with just a smidge of black gel colouring). The body of R2D2 was all sitting on the top of a cake base which a balanced on top of a small squat jar, using icing to prevent it sliding around. Then I propped the legs in place, leaning backwards, and used a blob of buttercream on each side to keep them there. 


Widget the Ewok (Little boy costume making adventures)

Sprog and Widget were invited to a Star Wars birthday party for their friend Master 5. The theme was Star Wars, and themed kids parties round here mean dressing up. I also said I would do the cake as a present. Details on that here


 When Husband had his birthday a few weeks back Sprog and I put together a Han Solo costume for him, so he was sorted, barring some last minute adjustments.
Widget on the other hand, slept through most of that party and didn't have a costume. Since Han Solo's best friend is Chewbacca, we decided to go Wookie for Widget. I bought some faux fur and started looking for patterns. From the fabric store I sent a pic to Husband to pick the right fur colour. This was a matter of great debate and was taken very seriously.


To make the costume last longer, in terms of the kids being able to fit it, I decided to do a two piece costume rather than a onesie version. I used a denim needle to pierce through the faux fur and, on the advice of those more experienced in sewing faux fur than me, used a contrasting thread for seams to make it easy to unpick mistakes. It was a super useful piece of advice too.

Widget has some great pyjama's I made a few months back, so I used the pattern for the bottoms from those to make furry trousers. I had some knit I picked up at the hospice shop a while ago for peanuts, so I put that in for the lining as Widget has had sensitive skin lately and I didn't want to aggravate it. I altered the waistband to have rib knit to make it comfy, then used some tape to thread through the waistband as a tie. Mostly because I didn't have enough elastic to hand and didn't want to buy any.


With that planned out I took to figuring out the top half. I knew I needed it to be a hoody, something I had not yet made, and so didn't have a pattern for. My first port of call pattern shop didn't have quite what I was looking for, but a bit of Googling later I found a free pattern from Brindille and Twig that suited my purposes really well. I decided to put a zipper down the front to make it easier to get a wriggly not-quite-2-year-old in and out of.

I cut the pattern out, using rib knit for the wrist cuffs, and adding  about an inch through the middle of the front for the seam allowance next to the zipper. I used a couple of old tops that I was going to get rid of for the lining. The pattern went together really quickly. I made sure to pull the fur away from the seam as best I could before sewing, another tip from the voices of experience. It made a difference to the fluffiness of the seams because the fluff layer wasn't trapped flat.

I made the body of the jacket in fur, with hood, and in lining without hood, then attached them when I put the zipper in. I stuffed this up and ended up with the zipper pull on the inside. I decided to just leave it. For an everyday item I would have changed it, but for dress-ups it wasn't going to be annoying enough when wearing to go through the bother of unpicking.

Partway through this process I showed Sprog some youtube clips of Return of the Jedi. He agreed with me that an Ewok would be a better thing for Widget to be than a Wookie, and a quick poll of friends who are Star Wars enthusiasts agreed.  This basically meant adding ears to the fur suit, and changing from an ammo sash, to a hood. Given my zipper was bright red and blue, just one I had lying around, turning Ewok and needing a hood was a great way to cover it up.

Before attaching the hood lining I cut two skewed half circles for each ear and sewed them right side together around the top of the ear. After turning them right side out, I cut slits in the fur hood, before poking the raw seams through. I wiggled them around to get them to fold inwards slightly, then tacked the raw edges to the underside of the hood holding them in place. One of the benefits of working with fur is that messy stitching gets covered up with the fluff.


One the ears were on, and the rib knit wrist cuffs were attached I sewed the hood lining to the fur hood, and then attached the hood lining to the lining for the body. I sewed it right sides together from the edge to the shoulder seam on either side, then topstiched the middle bit together.

One Furry suit: done.


There a quite a number of Ewoks in the movie Return of the Jedi, not even counting the ones in the standalone Ewok movie, or the cartoon. When I thought of Ewoks I always think of this guy:
So I planned for a hood that is long in front with ears peeking out the top. Also - this style covered up the blue/red zip. Huzzah!

I started with a square of pleather about half a meter square. I chopped straight through the middle to make two rectangles, then I cut a large corner off one of the rectangles. I stuffed a toy inside the furry jacket to hold it's shape then pieced them together until they made a satisfactory hood. I folded the leftover rectangle in half right sides together and sewed a curve to make it a hood shape, then cut two slits where the ears on the furry jacket were. I pulled the ears through to hold it in place. The rectangle with the corner cut off was attached to this on one side, with the cut off triangle attached to the other side to fill in the gaps. All of these seams I sewed wrong sides together to imitate the rustic-ness of Ewok garments. 


One Ewok Hood: Done
This Ewok likes sandwiches.

Today was party day, and I couldn't find Sprog's pirate vest anywhere, and that is what we used for Han Solo's vest. I had some pleather I had bought for the hood, but not used in favour of using up the pleather I had leftover from making the pirate vest. 

I cut using the vest pattern I had in stock, bought for the Paw Patrol vests, then used again for the pirate vest. I cut the back piece short, and cut the bottom of the front piece on an angle from the size 5 in the middle to the size 2, to match the back, on the seam. I sewed the shoulder seams together, then put it on Sprog and checked.  I matched the top corners properly for the side seams, then swivelled the piece so that instead of matching the seams down the edge, sewed straight down the back piece but on an angle relative to the edge of the front piece so I ended up about an inch  further in from the cut edge. 
I sewed on the line represented by the pencil. 
Hopefully this makes my ramblings more understandable.

I cut a little away at the top to stop the vest banging him in the chin. I also added a snap to hold the top corners together. Han Solo wears his vest open, but I wanted my little Han Solo to not worry about it staying on. 


The last bit was a holster for his blaster. My sister who has three kids herself, all older than mine, gave Sprog a blaster with great glee for Christmas. It was the perfect accessory for Han Solo. This was a matter of folding/rolling some pleather and sewing across to fix it at a size suitable for the blaster, then folding over the top to make a belt loop. 


The look was completed with decorated jeans. Decorated with a striped of masking tape down each leg on which I had coloured in red stripes.


Then it was off to the party with Han Solo and my little Ewok (and don't forget the R2D2 cake)


Sunday, September 11, 2016

Cake Edition - Thomas the Tank Engine, Paddington's Suitcase, Minion, Xylophone, and Paw Patrols' Lookout

I used to bake a cake, splat some icing on it and call it done. Then I went back to work after having my son and I guess some Mummy guilt kicked in coupled with a bit of "If she/he can do it I can do it"

Sprog's first birthday cake was a standard banana cake with chocolate icing. Sprog's second birthday cake was for a Thomas the Tank Engine themed party, so we needed a Thomas the Tank Engine cake. I baked banana cake, mostly because I had a lot of banana's to use up. Two slabs, which I then cut and stacked to get the right shape for a Tank Engine. Earlier in the week I coloured fondant and made wheels and a face using an online tutorial to guide me.


I fondant-ed the whole cake. It was my first time using fondant; I went a little overboard. If I were to make this cake again, and Widget's interests indicate I might, I would ice with butter icing, then accent with fondant, rather than doing the whole thing. 


The next year for Sprogs Third birthday, Widget was 3 months old, and I went for something simpler. It was a Paddington Bear themed party, and the cake was his suitcase. I made the cake slabs ahead of time with Sprogs help then froze them.  I made the "hardware" for the suitcase a few days out to give them time to dry and kept back enough fondant in the right colour to make the name shield and the corner protectors on the day. The writing I did with a skewer and black gel icing. 

Husband got in on the act, and I made a Star Wars themed cake for his birthday. Only a simple one the first time round. The letters are in black fondant, with butter icing as a base and yellow piping. The figurines my brother bought for Husband as a present and they made a great addition. 


A single dad friend was throwing having a party for his son. He was at a loss cake-wise so I made a cake for Master 4's Minion party. This time I cheated a little and used packet mixes for the cake, with yellow and blue colouring mixed in. I stacked the two yellow on top of the two blue cakes, with butter icing as glue. I covered the lot in yellow butter Icing then wrapped on blue fondant overalls. The top of the cake had the dungaree straps and fondant goggles and eyes, and I cut a smile into the yellow butter icing and pricked a Gru logo and buttons into the front pocket of the overalls.


Widget's first birthday was next, and he had a relatively simple cake, by my new standards. He had been showing interest in music/noise making so a simple cake that was still more than a basic cake was a xylophone, based on his plastic toy xylophone. Each key is made of fondant, as is the head of the bommy-knocker. The fondant is kept off the icing, and therefore dry, by licorice logs, with another licorice log as the handle on the bommy-knocker.

The last cake to bring us up to date was the Paw Patrol lookout tower. Sprog was in a big Paw Patrol phase when he turned 4 and had a Paw Patrol themed party. To complete the look was a Chase pup painted on the window, still there 6 months later, and a themed cake. The Paw Patrol lookout tower looks like this.

I made 4 cakes worth of cake in the end. Two as one  big chocolate slab cake, and two circular banana cakes. I considered making the whole thing out of cake, but it would have been too unstable. 

The chocolate slab I cut a hole out of and iced green with a grey fondant road. in the hole I put an Easiyo container. I taped another Easiyo container to the bottom part of a springform cake tin. A second springform tin bottom I taped to a ramekin, and cut a hole out of one of the circular cakes to fit it in the middle. The easiyo tin sat inside the first with a circular cake with a hole in it on top, then the ramekin and cake tin assembly sat in the middle of that. I made sure it all fit together and was relatively sturdy, then took it all apart and got decorating. 


The  final touch was the periscope. That was a couple of straws wrapped in fondant. When they were iced everything was carefully put together again then no one was allowed to touch it, and in the case of young people, go near it until it was cake eating time. 


So cakes. They are a thing I've started doing.


Saturday, August 27, 2016

Star Wars TIE fighter cake

Husband's birthday was this week. In the practice of adults the world over we postponed the celebrations till the weekend. One of the things I like to do is bake. Since I've had kids I have been stepping up my game with cakes (Thomas the Tank Engine, A xylophone, Paddington's Suitcase, Paw Patrol's Lookout Tower). After a bit of prodding Husband said he would like a TIE fighter cake. A TIE fighter is a little fighter spacecraft used by the Empire in Star Wars. It looks like this...
...So he wasn't asking much.


It took a few days to figure out, but it all came together when I saw these bowls at the supermarket.They're 18cm in diameter and metal, so I could bake them. I could have bought proper cake tins, but hemispherical cake tins cost $20-30 apiece. These cost $5 apiece. Also the flat base worked in my favour for the front and the back of the TIE fighter where the windows are.
 

For this cake a used a tried and true chocolate cake recipe which has been the basis for previous birthday cakes. It's not too rich and holds together well. I think I got it off the back of the cocoa packet before Sprogs 3rd birthday (Paddingtons's Suitcase).

Cakes were baked and left to cool, and the next night I made the wings out of gingerbread. Gingerbread is one of my two "I'm gonna bake biccies, what recipe shall I make" standby's but it is also great for structural work. That's one of the reasons it's so good for edible houses (Midwinter Christmas 2016). To size the wings I folded a piece of baking paper into 6ths (halved, then thirds) and cut 9cm down from the point (half the diamter of my "tins". A real TIE fighter has wings way way bigger than the central ball, but that would be a structural nightmare, and a bad cake:gingerbread ratio.


That second night I also made a half batch of butter icing, dumped a bit of black in, to make it greyish, a bit much, then sliced the tops off and matched the two cakes together to make a vaguely spherical shape, remembering that the flat bottoms of the cake would be the front and back of the TIE fighter, then I crumb coated the cakes and the insides of the wings.  I used Chocolate fondant and gel colouring to make black fondant and cut out a large circle for the front, a small hexagon for the back, and 12 triangles to go on the outside of the wings.


Today was the rest of the challenge. Assembly and decorating. I made up another batch of butter icing, and added some black colouring. Interestingly a little black took the very slight yellow tinge from the butter away and made it look whiter. I added a little more to make it a light grey, then coated the ball of cake and the outside of the wings. Before the icing dried I stuck the black fondant triangles on. 


It was Widget's nap time, so we both had a nap, and when I came back the icing had stiffened a bit. I added some more icing and smoothed it out with a palette knife. I used a very very short jam jar to hold the cake ball off the platter. I put it at a slight tilt, then added the fondant windows, and piped the framing on using the leftover icing darkened ever so slightly. I held the wings up and approximated where, then stuck skewers through the cake to hold up the wings. The weight of the wings is on the platter, but they are held vertical by the skewers. Two skewers per wing. Then it was just a matter of piping on detail. My detail piping is not very good, but I started with the most important details and worked down till I ran out of icing. 

Front                                                                 Back


I really like the hexagonal lines on the inside of the wings, with the darker grey base icing. From a distance it makes the whole TIE fighter look come together. Also from a distance you can't see my messy piping :-) 

Husband had the biggest grin when he first saw it.  I'm just hoping it all stays together until his party tonight!